There is no denying it, content is still king! Over 5 million blog posts are written per day and 55% of marketers say blog content creation was their top marketing priority last year.
But digital marketing trends shift according to web users’ behavior. So, while 20 years ago “content was king,” today, “quality content is king.”
Several years ago, HubSpot did a study on how blog posts performed over time. They found that 1 in 10 blog posts were compounding (traffic increased over time) and generated 38% of overall blog traffic. Over their lifetime, one compounding blog post created as much traffic as six decaying posts.
This is starting to look like the 80/20 rule at play. The 80/20 rule (the law of the vital few) states that, for many events, roughly 80% of the effects come from 20% of the causes. Or in this case, 80% of the traffic is coming from 20% of the posts.
I think many site owners will find this to be true of their own content, if not even more lopsided — such as 90/10, when considering things such as lead generation.
So what about the rest of the content? How is it performing? Is it a drag? Should it be replaced, rewritten, or deleted?
These are some of the questions a good content performance audit is designed to answer. It’s a good idea to audit your content’s performance if you have any important SEO or broader digital marketing initiatives in the works.
For example, Page One Power provides a wide range of SEO services, with a focus on off-page SEO. Before beginning a link building campaign, we recommend our clients audit their sites to ensure there are no underlying on-site or technical issues that could reduce the efficacy of off-page efforts.
In this post, I’ll outline some of the metrics we use to analyze content performance as part of our overall SEO auditing services.
What is a Content Audit?
A content audit is a process of gathering and evaluating a website’s content. Depending on your goals, there are a few different types of content audits you could perform.
Types of Content Audits
Qualitative Content Audit - A qualitative audit evaluates your content based on criteria such as content structure, readability, branding, tone and other subjective criteria. These factor into the overall usability of the content on a site. Does it speak to the user? Will the user find it actionable?
Competitive Content Audit - A competitive content audit focuses on what types of content your competitors have published, what types are attracting quality links and what type is performing the best? From this you can focus on any gaps between your competitors high performing content and content on your website.
Content Performance Audit - A content performance audit focuses on grading your website based on a combination of factors such as organic search, links acquired, bounce rate, Google Search Console clicks, etc. The combination of how visitors interact, how many other quality sites link to a site and overall usefulness of the content really defines how it will perform.
Regardless of the type of audit you are performing it is important to decide on the criteria and metrics you need to collect before you start the audit. The goals of your audit should help dictate what criteria and metrics you will collect in your audit. These may vary depending on the size and type of your website (informational, eCommerce, personal, etc.)
In this article I will be giving an example of a content performance audit. I will be focusing on how to collect the data you need to properly evaluate your web pages. Also included is a template that you can use to help guide you through the process.
Get your FREE content audit template here!

Why Audit the Performance of Your Content?
Over time, websites become bloated with content that is underperforming, outdated, irrelevant, or just not adding any value to visitors — this hurts conversion and engagement.
If this is left unchecked, these low-quality pages will affect the perceived quality of your website viewed by visitors and search engines. Senior webmaster trends analyst at Google John Mueller has explained that Google evaluates the quality of a site based on all indexed pages.
So does this mean you are only as good as your worst content? Not necessarily.
Mueller explains if you have a large site then the algorithm will understand it is only a handful of pages, not the overall site, and adjust the quality score accordingly.
However, low-quality content isn’t just an SEO issue — content quality also affects how users interact with your pages. Over time, Google will be able to tell if users are happy with the content you are serving them, and if users aren’t happy Google will demote the content.
Here’s an overview of the process you’ll use to audit the performance of your content.
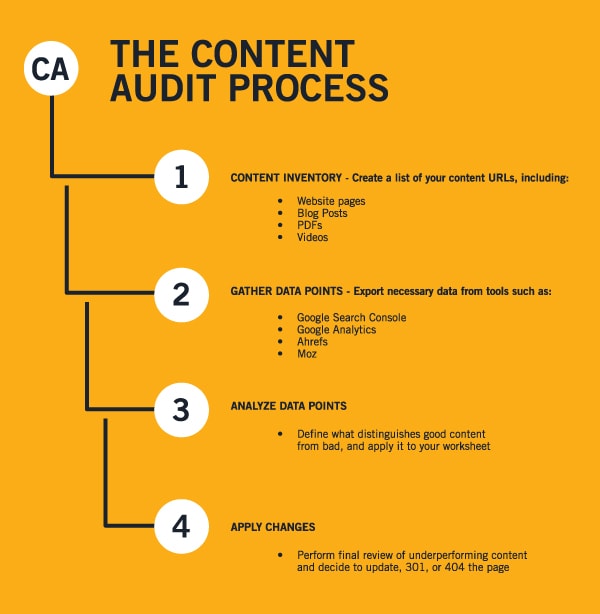
What is Content Inventory and Why Does It Matter?
The first step of any content audit is doing a content inventory of all informational assets on a website. Wikipedia defines content inventory as “ the process and the result of cataloging the entire contents of a website.”
What this means for the content audit is you need to find all the pages on the website. Unfortunately, this isn’t always as simple as you would expect.
Step #1: Conduct The Content Inventory
A content inventory will uncover orphaned pages.
Orphaned pages have no internal links from any other page on the site. This doesn’t necessarily mean they aren’t indexed, it just means that when you crawl the website the crawler might not be able to detect the page, hence the phrase “orphaned”.
To make sure you have an accurate content inventory, you are going to use Screaming Frog and configure it to not just crawl the website, but also the URLs found in the sitemap, Google Analytics (GA) and Google Search Console (GSC).
Screaming Frog Configuration for Content Inventory
The basis for this content performance audit is built around Screaming Frog’s crawler. As you discover all the URLs for the website you will also be pulling metrics such as clicks, visits, and bounce rates for the corresponding pages.
To configure the crawler for the content inventory, you are going to need the location of the sitemap and login for GA and GSC. Once you have that information follow the steps below:
Configure Google Analytics API
-
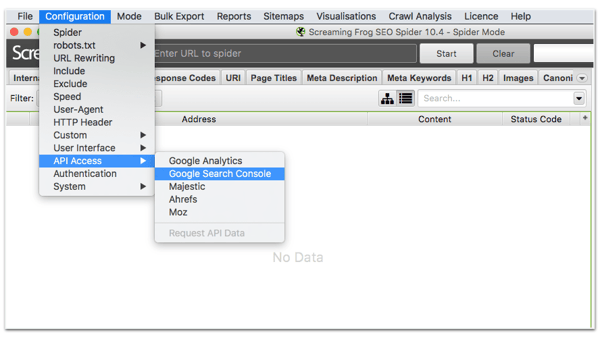
Google Analytics Integration — Configuration > API Access > Google Analytics.

-
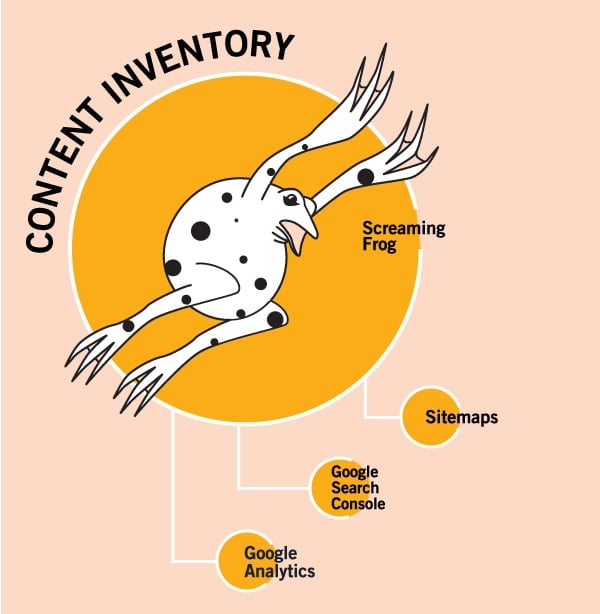
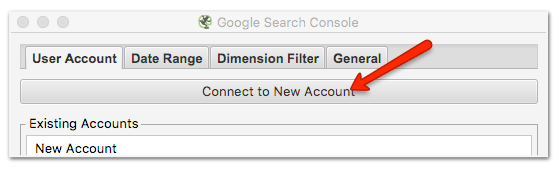
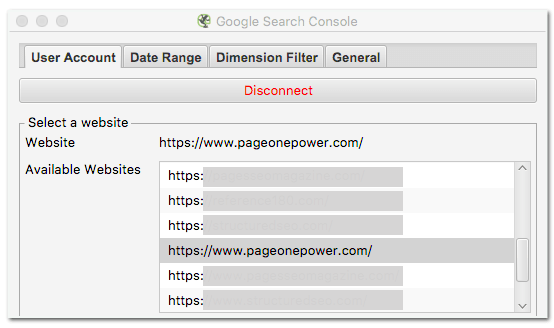
Choose the GA account associated with the website you're going to crawl or add a new one. If you have to add a new account, just follow the prompts after clicking “Connect to New Account’. You will be signing into your Google Account and can choosing the appropriate GA account from there.

-
Select the account, property, and view you want to associate with the GA account. You can change the segment to other options, such as organic. I’m going to use the default because I’m looking for any value the page might have, not just organic.
-
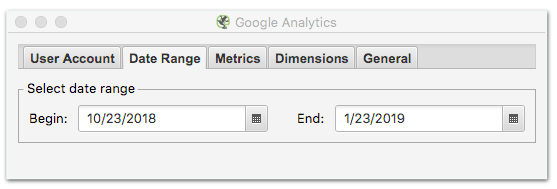
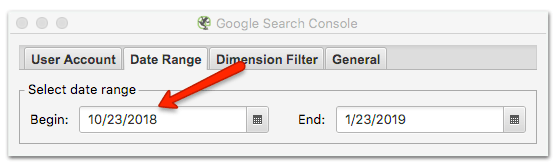
Choose a date range for GA — I like to go back 90 days.
-
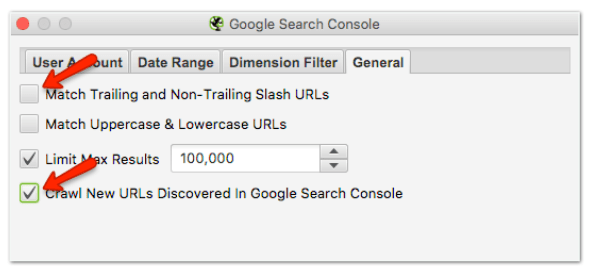
The last thing you want to do is under the “General” tab. Uncheck the first box “Match Trailing and Non-Trailing Slash URLs” and check the last box labeled “Crawl New URLs Discovered in Google Analytics” — this will help find all orphaned pages. Even if there are no internal links, if your GA is configured correctly all pages will have GA tracking codes. Keep in mind if there haven’t been any visits to a page it will not be found in your analytics.
You can also configure the “metrics” tab to collect other metrics that you might find valuable.
For example, if you have an eCommerce site and you are using GA for tracking conversions, then knowing how many conversions are happening on a page over time would be beneficial. You can learn more about configuring GA API from Screaming Frog’s own tutuorial.
Configure Google Search Console API
-
Google Search Console Integration— Configuration > API Access > Google Search Console
-
If you haven’t connected it to an existing account choose “Connect to New Account” and sign into the Google Account associated with the correct GSC.
-
Once connected choose the relevant website property.
-
Choose the date range. I’m going to go with 90 days to match how I configured GA. Always make the date ranges for each API the same.
-
Last under the “General” tab, uncheck the first box “Match Trailing and Non-Trailing Slash URLs” and check the last box “Crawl New URLs Discovered in GSC”.
Just like the Google Analytics API configuration above you can configure the other tabs to collect other metrics that you might want included.
Configure Screaming Frog’s Crawler
When crawling a large site it can take a lot of time. Since you are really looking for just the HTML URLs you can configure the crawler to ignore things such as images and Javascript. You will begin by disabling the different types of files the crawler is looking for.
-
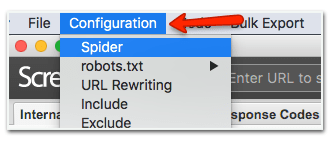
Configuration > Spider
-
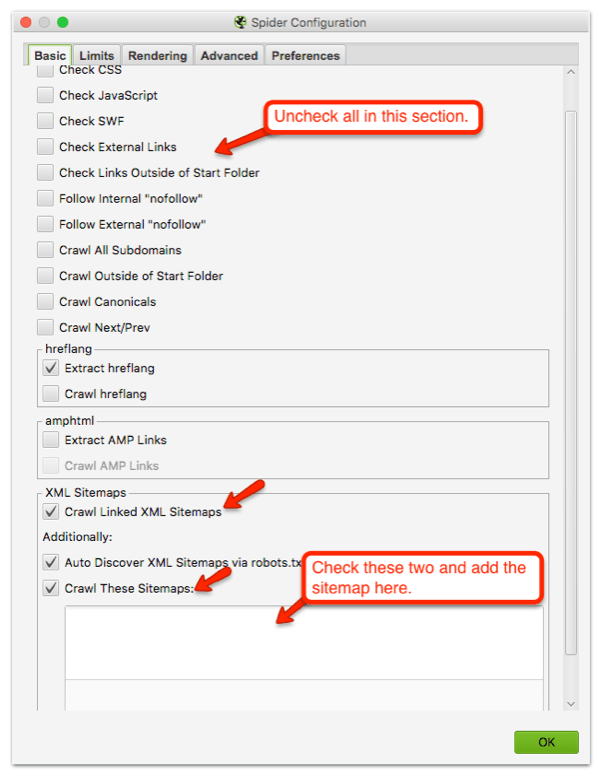
The first tab will be labeled “Basic”. Uncheck everything in the first section.
-
Under the section labeled “XML Sitemaps”, check the box labeled “Crawl Linked XML Sitemaps” and “Crawl These Sitemaps” and add the sitemap. I don’t recommend using the “auto-discover sitemaps via robots.txt”. You are going to configure the Screaming Frog crawler to ignore noindex pages so if the sitemap (in the robot.txt) 301’s to another sitemap then it will not find the sitemap via this setting.
-
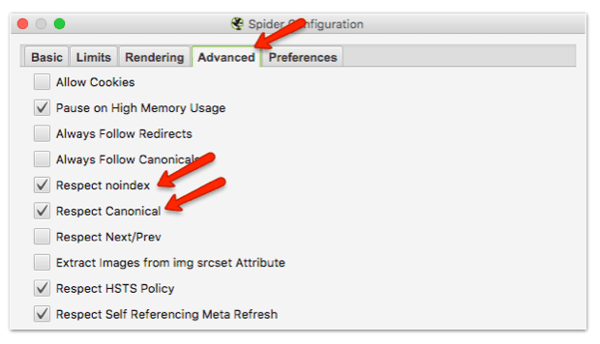
The last setting is found under the “Advanced” tab. Here you want to check 2 boxes “Respect noindex” and “Respect canonicals”.
Exclude Unnecessary URLs
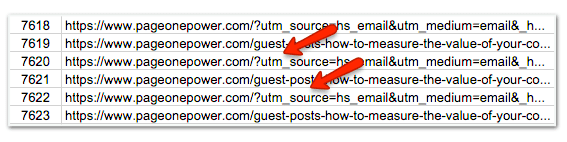
During the setup of the APIs, you will set Screaming Frog to crawl any new URLs found. This can cause the inclusion of URLs that you don’t need. For example, some URLs found in Google Analytics may contain URL parameters, which can be caused by simple things such as having a search function on your website.
For example, I have a search function on my own personal website Structured SEO. When I search for an infographic, my site will generate a page with the results from that query. It will also add the search parameter to the URL, (/?s=infographic) which is then recorded in my analytics.

There are several ways to remove these URLs. Once you have crawled the site and exported it you can filter them by the query parameters and delete them manually or if you know what the parameters are you can exclude them from the crawl itself.
When I crawl Page One Power without removing parameters we have almost 8,000 URLs. Considering I know we should have well under 1,000 URLs that is a lot of bloat to clean up manually. Instead of manually removing parameters, I’m going to show you how to do it using the “exclude” function.
-
Do you know your parameters? They usually start with a “?”. So you will want to exclude these from your crawl.
-
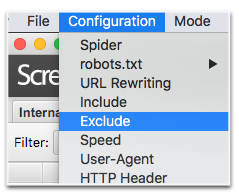
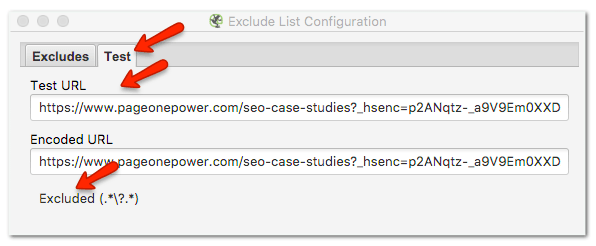
Configure Exclude — Configuration > Exclude
-
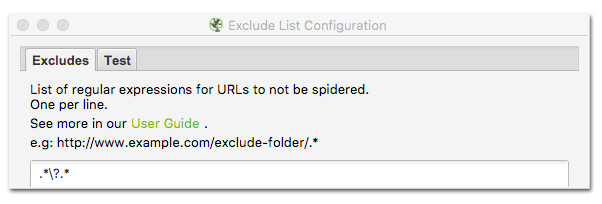
Here you can exclude URLs from a crawl by supplying the regular expressions (regex) you want to be excluded. Keep in mind they are not just excluded but not crawled at all.
You can exclude by directories (http:/example/shoes/.*) URLs that contain a certain word (.*search.*) or in my case by a character in the URL (.*\?.*) Note that “?” is considered a special character. When special characters are used in regex it must be escaped. This just means that a “\” must be in front of the special character or the “?” will have a special meaning.
Now you can test it. Click on the “Test” tab and enter the parameter you are excluding to the end of the example URL.
Notice at the bottom it says “Excluded” and gives the reason why (.*\?.*). If you enter the exclude impression incorrectly this will let you know before running a crawl. You can learn more about using the exclude button here.
Crawl the Site
Now you are ready to crawl the site to collect all the URLs and corresponding analytics. Just enter the website in the top bar and hit ”Start”.
Step #2 Export Screaming Frog Results
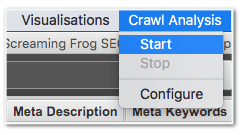
Once the crawl is done, make sure you do a crawl analysis. If this isn’t done before exporting certain things, such as link score, won’t be available in the export.
Crawl Configuration — Crawl Analysis > Start
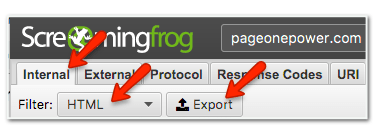
Now you are ready to export the URLs. You don’t want all the URLs, just the URLs of HTML pages. You can easily do that by making sure you are on the “Internal” tab and filter by “HTML”. Then just choose where you want to save it and the type of file.
Export URLs — Internal > HTML > Export
Step #3 Import Screaming Frog Results to the Content Performance Audit
Now that you have all the URLs and information from Google Analytics and GSC, you can add it to your content perfomance audit template. Open the template and go to the “SF Export” tab.
Just copy and paste the whole sheet as is. It is very important that the data is in the correct columns for the formulas to work correctly.
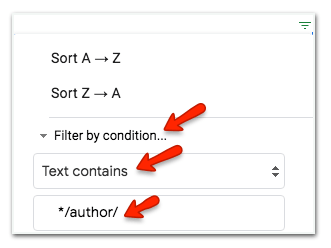
A quick scan of the URLs can also point to other URLs that you may want to scrub from the list. For example, pagination and author pages. In my case, I know that these pages have “/author/” and “/page/” in the URL so I can filter the worksheet by these attributes and delete the corresponding pages. The more irrelevant pages you can remove from the worksheet, the clearer picture you’ll have of your content.
To do this, “Filter by condition… > Text contains > then */value/.
Step #4 Ahrefs and Majestic Data Export
Ahrefs is one of my favorite tools. They have one of the biggest link indexes, but what really separates it from other tools — in my opinion — is their intuitive interface and host of useful data points. Majestic is also known for having one of the biggest if not biggest link indexes, and it’s another tool I like to use in this process.
If you don’t have access to Ahrefs or Majestic accounts you can replace them with other tools, such as SEMrush or Moz. Keep in mind, if you want to use different tools in their place you will have to make adjustments to the formulas.
The primary goal here should be to extract referring domains. Personally, I like to look at a few other metrics, but overall you can get away with using Ahrefs, Majestic and possibly Moz alone to find the referring domains.
Ahrefs Data Export
-
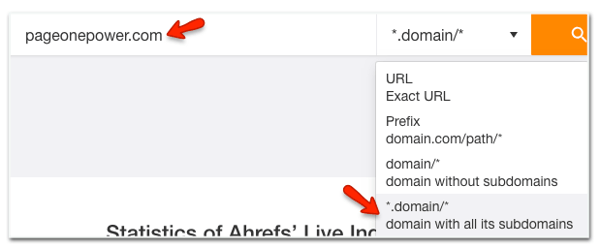
Go to Ahrefs Site Explorer and enter your domain and choose “domain with all its subdomains” from the drop-down.
-
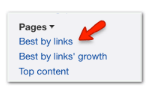
From the side menu under “Pages” click on “Best by links”.
-
Click “Export”, “Full export” and choose the format.

-
Open the export and copy the data to the tab labeled “Ahrefs Export” tab. Again, it is very important that you paste the whole doc into the worksheet.
Majestic Data Export
-
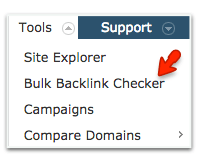
Go to Majestic, “Tools” and “Bulk Backlink Checker”.
-
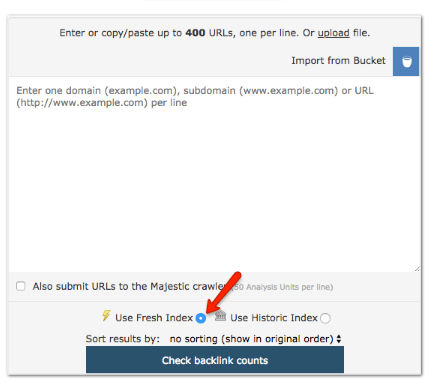
Here you have the option of pasting the URLs you wish to check or you can upload a file that can contain up to 1 million URLs. Also, make sure you check the “Use Fresh Index” at the bottom.
To create a CSV file, you can create another tab in your worksheet and add all the URLs from the “Screaming Export” tab to the first column of the worksheet and then download that worksheet as a CSV file. Then, you can upload the CSV file to Majestic.
-
Once the file is complete, open it and copy and paste the whole document to the “Majestic Export” tab.
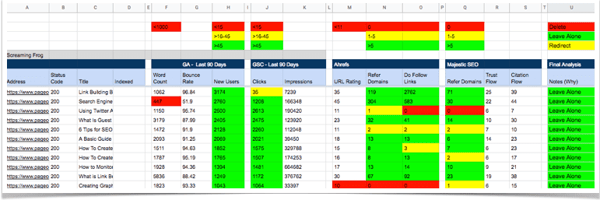
Step #5 Analyze the Data and Make Recommendations
Here is when things get subjective. The variables are limitless, and results are up for interpretations. Luckily, the template provides a color coated guide to get you started.
I like to start with the extremes. If the site is bloated you will find a lot of pages with no traffic, links, or clicks. These pages are just holding you back, and in most cases can be chopped off without much deliberation.
The one exception is if any of these pages are what I refer to as a “core page.” Core pages are pages essential to the site, regardless of their SEO value. This could be something like a “Terms and Conditions” page.
I like to sort by “New Users,” with the fewest being at the bottom. Then I can start reviewing at the bottom of the sheet and work my way up as I add the recommendations. This also helps me get a feel for the site before I get to pages that are more subjective.
Sometimes I will find batches of similar pages that may have been used for things such as marketing purposes, but really have no value. While these pages might have had a purpose at the time they were created, they’ve missed the mark in one way or another and need to be removed to avoid dragging down the quality of the site.
When you get to pages that have some traffic and links, things can get a bit complicated. This is when you have to look at the page and ask yourself:
-
Is it worth updating?
-
Are there keywords close to ranking that would make this page worth updating?
-
Should I 301 it?
-
Does it have dofollow links from a quality site, or just some nofollow links from a low-quality site?
Keep in mind: if the page has nofollow links but they are coming from a quality site, it might be worth a 301, especially if you have a similar page you can redirect it to.
When you do 301’s, make sure they are pointing to relevant, quality content. Something else to be aware of is that you can end up with redirect chains after performing several audits, which can hurt crawl budgets. And when you are done making all your changes, check the site for internal broken links from pages that were deleted.
Always remember that a content performance audit can only produce a recommendation based on the parameters you choose. The parameters I used in this article were based on my tolerance for risk and my goal, identifying the lowest quality content for pruning. You may find you need to alter your audit to better fit your needs.
Conclusion
Content performance audits should be performed on a regular basis. The more content you produce, the more often it should be done.
The usefulness of a content performance audit isn’t limited to pruning. For example, you can approach your audit from a different angle, and review what types of articles are generating traffic and attracting links. This could help when you’re making decisions about what content to produce.
Remember the content performance audit is just a tool and can never be fully automated. Audits can guide you and make you more efficient in your efforts, but at the end of the day, the website manager will need to use their experience with the site to make the final call.
Good luck with your own auditing — if you find yourself stuck, you know who to call!